Wednesday, 20 March 2013
Media Coursework Update 10
Since my return from the New York trip i have been working on my construction of my magazine. I have fallen behind whilst catching up with other subjects and my time management has become an issue. To solve this problem i plan to timetible my workload so that i spend an equal amount of time for each subject, especially focussing time towards the subjects i am behind in. I will come to as many revision sessions in the Easter holidays as possible so that i can use the college facililities to get work done. I think if i put enough effort in i can catch up where i have fallen behind. I previously addressed time management an issue as i knew it would be problematic when trying to reach deadlines. Im going to focus on working at a steady pace so that i reach my final deadline rather than getting worked up over preliminary deadlines.

Monday, 25 February 2013
New Smart Targets
From recieving feedback from my teacher on my research and planning i can see i
need to work on my developement and my exploration of my work. My work is
under-developed and therefore not up to a high
enough standard which i am capable of achieving.
Another key issue from my original Smart Targets which has remained a problem is time management. After meetings and discussions with my teachers i have planned to timetable my work load for each week around my schedule so that i balance my workload. I also plan to use the easter revision seshions to catch up and improve my work.
Finally i need to proof read all of my work, after reading through some of my teachers comments i can see many sentence faults, both with grammer and spelling.To improve this i need to read through my work again before publishing or printing anything and possibly getting someone else to read my work too to proof read it.
Another key issue from my original Smart Targets which has remained a problem is time management. After meetings and discussions with my teachers i have planned to timetable my work load for each week around my schedule so that i balance my workload. I also plan to use the easter revision seshions to catch up and improve my work.
Finally i need to proof read all of my work, after reading through some of my teachers comments i can see many sentence faults, both with grammer and spelling.To improve this i need to read through my work again before publishing or printing anything and possibly getting someone else to read my work too to proof read it.
Sunday, 24 February 2013
Media Coursework Update 9
I found that although I worked this half term on my media coursework in all available time I still have five tasks left to complete. As soon as I am back from New York I will stay at college to make sure I catch up with this work and any work I miss.
Tasks still to complete-
Tasks still to complete-
- Podcast discussing genre mood boards
- Write double page article
- Pitch music magazine
- 3rd hand drawn drafts
- Computer generated drafts
Saturday, 23 February 2013
InDesign Tutorial Video 4:
From watching this video I learnt that:



- Once you are happy with a font element, lock it down by right clicking then pressing lock. To unlock hover over the lock symbol and click.
- Below font size you can tighten up line spacing also.
- To change a text's boldness go to the bottom right corner and edit the weight of the stroke.
- To align text from this...
- To something like this...
- By clicking the indent tool like so until you are happy...

- To give your text box a background colour select your text box and click the fill tab like demonstrated below and choose a colour.

OR
- How to create a barcode from scratch-
- Use the rectangle tool to draw a rectangle of a reasonable size.
- Edit the colour to white, the same way as done above.
- Draw using the line tool to create perfectly straight lines of different point weights (thickness/boldness).
InDesign Tutorial Video 3:
From watching this video I learnt that:


- The black outline is the physical edge of the paper, the purple frame is only a margin.
- To change low resolution images to high quality images go to View - Display Performance - High Quality Display
- Don't click on the circular disk in the middle of an image when moving it as it crops of some of the frame. If this does happen press Ctrl Z or Cmnd Z.
- By dragging from the ruler on the top or side of the screen you can create guidelines (turquoise) to help line up elements together to be in line with one another. To remove them you can click directly on them and drag them back to the ruler.
- For a mac there is an application with you can download for free called FrontDoc which means you are able to preview a word or phrase in different fonts.
- For windows there is a similar application called NexusFont.
- If the text disappears or you need to manipulate its size you can use the black arrow tool to do this along with control or command if you wish to manipulate the size also.
- To adjust how closely the letters in text are spaced together, double click the text tool and then click on the track adjustment at the top of the screen. You can also do this for individual letters as well as whole words or a block of text, based on what you select.
- Use the eyedropper tool on the toolbar on the right to select a colour already used on your screen.
- To prepare an images focus to go infront of text whilst its background is behind the text, use photoshop. Open the image in photoshop. Crop the image using the cropping tool and width and hight settings to the same measurements as your InDesign document.
- Create a full size image layer and also a layer which is just a cut out of the images focus (eg a person) which you want over the text.
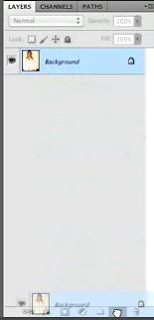
- Duplicate this layer by dragging the background layer to the small icon at the bottom of the screen (image below).

- To crop the new layer use the quick selection tool to select what you want to keep. Then click the refine edge tab at the top of the screen to make sure all hair detail etc is included. Drag the default tool over where hair or other detail means the background, photoshop will remove the background leaving the detail
- Create a layer mask of the cropped image so you can test it against a transparent background by clicking the small icon at the bottom of the screen (image below).

- By clicking the eye icon next to background it puts your cut-out against a transparent background (top image below) which looks something like this (bottom image below).

- Save two copies of the image. One with the background image- 'full crop' and one with the background not visible- 'full crop cut out'. REMEMBER TO SAVE BOTH AS PSD. DOCUMENTS.
- To rearrange layer click on the object, right click and press Arrange- Send Backward.
Media Coursework Update 8
I have been very unlucky today and experienced many technical difficulties.. firstly my laptop server crashed which meant I could't turn it on for several hours. Then once I had finished my hand drawn drafts I couldn't upload them because my scanner broke. My mum went to the shop to buy a new one and that one also didn't work. I will therefore to resolve these technical issues, take photos of my hand drawn drafts and upload them until I can scan them in properly at college.
Media Coursework Update 7
Whilst writing my magazine article today, I have found that by doing these things, it has helped me to complete an article which reads well.
1- By reading several issues of the magazine in which my interview is inspired by helped me get acquainted with its preferred style and format.
2- I learnt that it is important to write my interview with a focus, i decided on my article's purpose: whether it was promoting her new album, sharing her tips for aspiring singers, or her plans for a future or upcoming tour. I chose to touch on several topics, but have one clear story angle.
4- Using pull-out quotes to highlight especially funny, emotional or revealing quotes is important to gain the readers attention. Powerful pull-out quotes can draw in casual readers who are simply flipping through the pages.
5- I think it is important to end as strong as you begin. You need to find a way to hook them in at the beginning, and leave them with something to think about at the end to make an interesting article.
3- I discovered people read interviews to find out who the "real" person is behind the celebrity. I think it makes a better article if you are telling anecdotes about the subject's family life, personal relationships and quirky habits. I think if you include something unexpected for someone of such high status it will interest the public, such as the beautiful singer who was rejected from many different record labels. Anecdotes about such things bring the artist to the readers level so they can connect with their stories.
Subscribe to:
Posts (Atom)